

It's a hassle, but it's necessary.
Learning how to wrap hands for boxing is an essential skill—one of the very first skills every new boxer should master.
Hand wraps aren't ornaments or nice-to-haves.
They protect the small bones of a striker's hand, stabilizing the wrists and providing cushion and support for the knuckles. Learning how to wrap the hands takes time. Once your students have it down, the whole process takes about a minute.
We'll cover hand-wrapping technique, how to verify that your wraps fit correctly, and common mistakes beginners should avoid.
Why You Should Wrap Your Hands (and What Happens If You Don't)
It's common for some beginners to refuse to wear hand wraps. They may not want to deal with the hassle of wrapping their hands before class or washing stinky wraps afterward.
This is an injury waiting to happen.
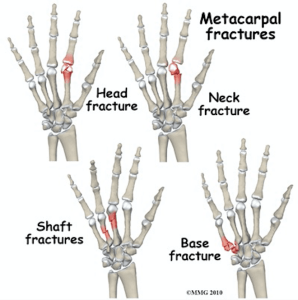
This is even worse than it sounds, as you can see in the image below:
The hand has 27 bones that have to stay aligned on every punch—that's the structure a wrap holds together.
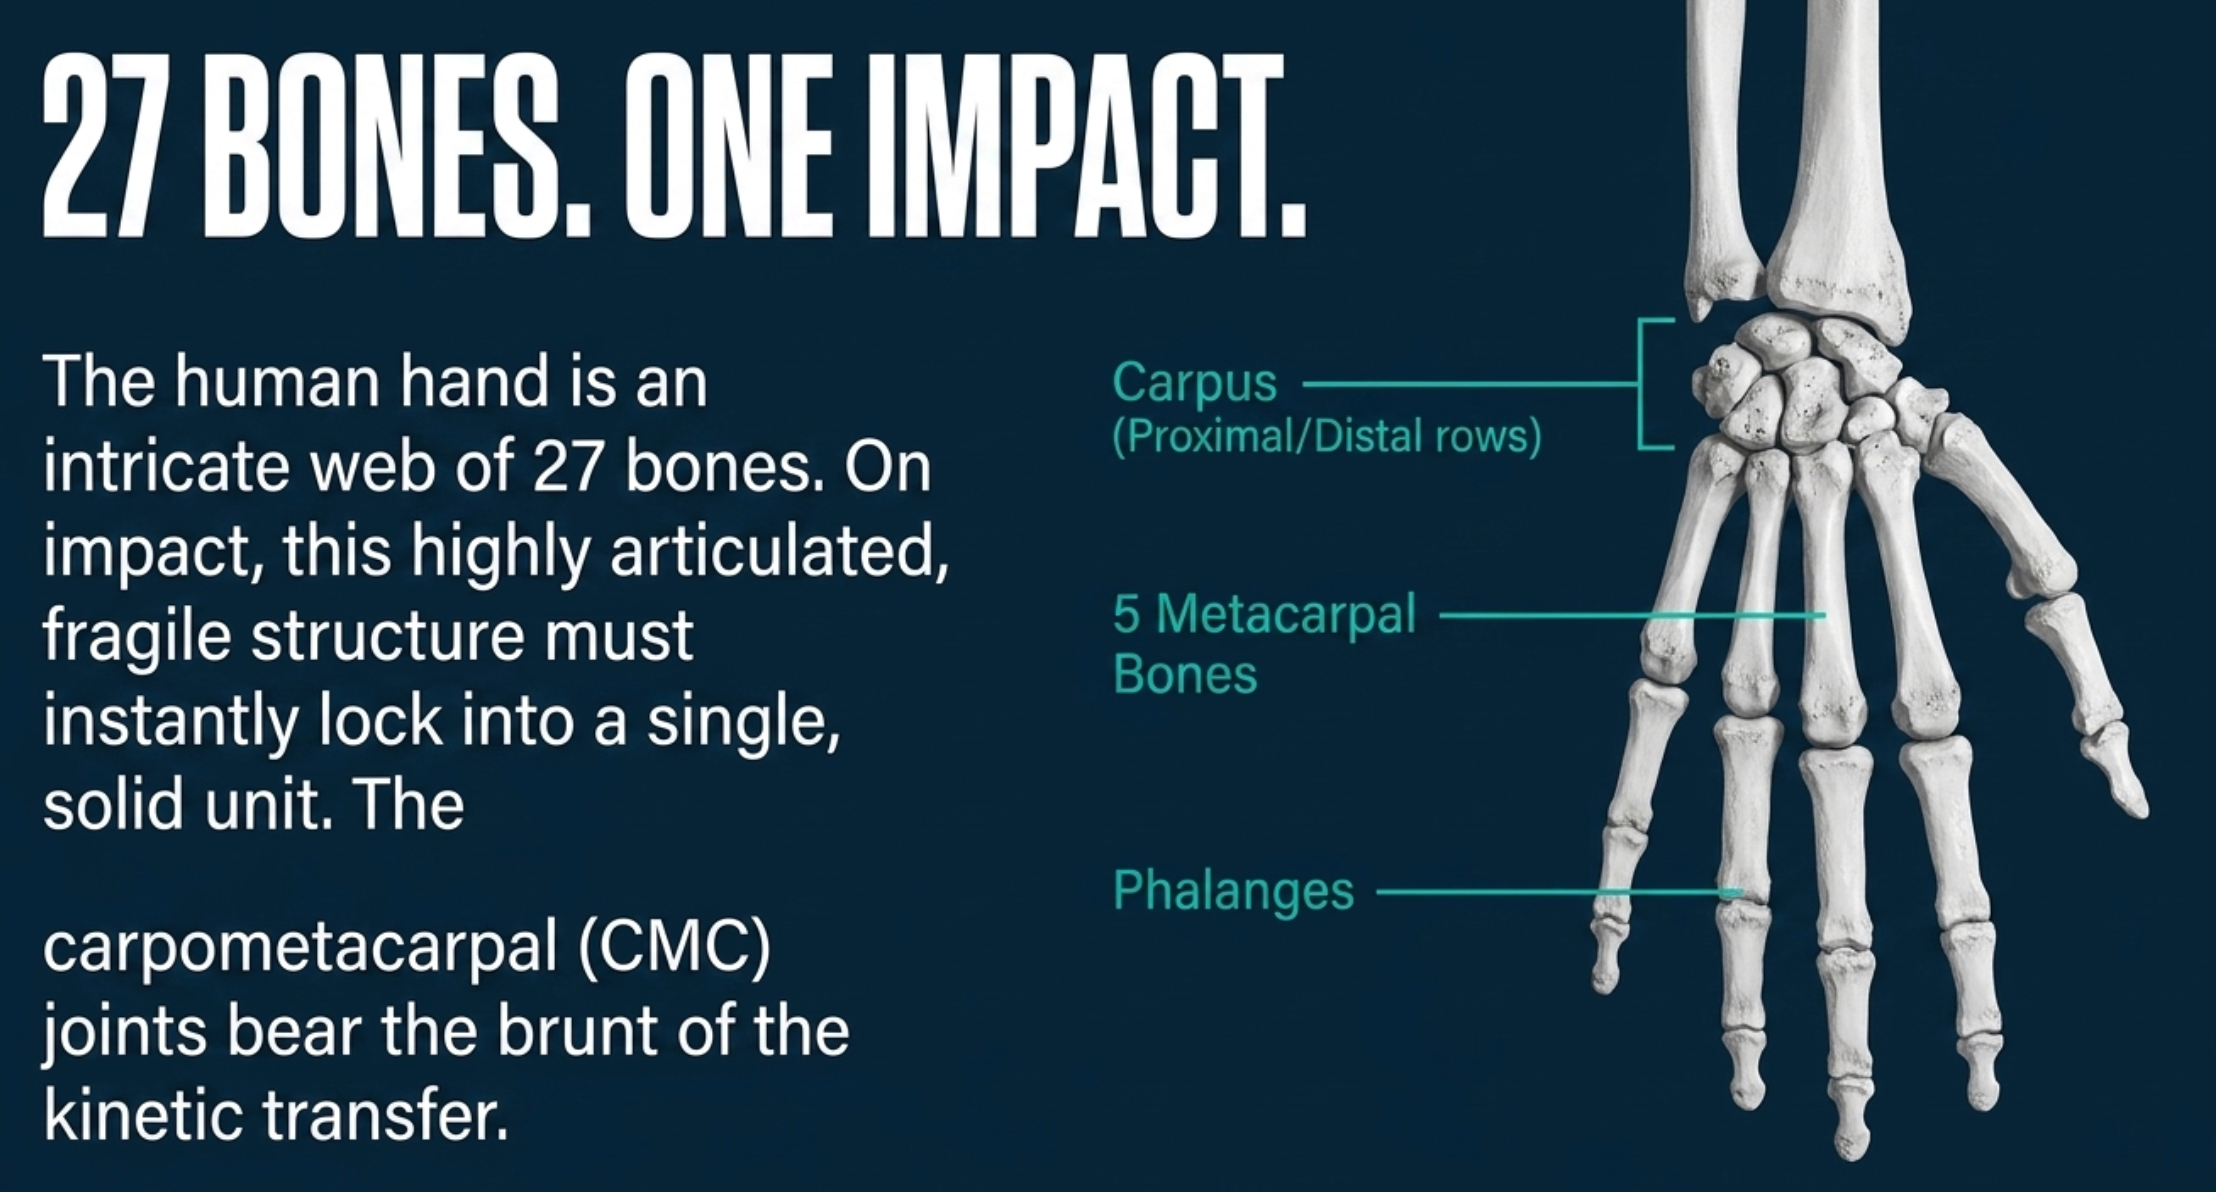
When students wrap their hands, it helps bind the metacarpals, those little bones in their hands, into a stable structure. It supports the wrist and spreads the impact out across the knuckles.
Here's a good rule of thumb (pun intended) beginners should remember:
KEY TAKEAWAY:
Hand wraps protect your hands. Gloves protect your partners and opponents.
If students are going to train safely, they need both — especially when they're sparring or hitting the heavy bag.
Choosing Between Cotton, Mexican, and Gel Wraps
Most beginners do best with a traditional cloth wrap before experimenting with other options.
Wrap type |
Stretch & feel |
Price |
Choose it if… |
Watch out |
Cotton — the default starter |
No stretch, breathable |
$ |
You're outfitting beginners or buying for the gym in bulk |
Bunches if wrapped unevenly; least contoured fit |
Mexican-style — the all-rounder |
Semi-elastic, molds to the hand |
$$ |
A regular trainer wants a snugger, custom fit |
Takes a bit more care to wrap evenly |
Gel / quick — the grab-and-go |
Slip-on padding, no wrapping |
$$$ |
You need speed for fitness rounds or bag work |
Thinner wrist support; not for hard sparring |
Need some help with selecting boxing hand wraps and gear? Take a look at this helpful merchandise guide for a breakdown.
How Long Should Your Hand Wraps Be?
Choosing the correct length makes wrapping much easier. Most adult boxers opt for the 180-inch wraps.
Boxer / hand size |
Wrap length |
Typical use |
Kids & juniors |
108" |
Kids' classes, smaller hands |
Shorter or beginner adults |
120" |
Learning the wrap, lighter bag work |
Most adults |
180" |
Bag work through sparring — full finger weaves + wrist support |
Larger hands / max padding |
200"+ |
Extra knuckle padding, bigger hands |
It all depends on preference; however, most adult boxers opt for 180-inch hand wraps. This gives you plenty of material for finger waves, knuckle padding, and wrist support.
Start with cheap cotton hand wraps and use them to find the length that works best for you. Once you've identified the length you're looking for, then upgrade to Mexican hand wraps.
How to Wrap Your Hands, Step by Step
As an experienced instructor, you're probably aware that there are lots of ways to wrap your hands.
It's all about choosing the methods that work best for your students. If you're looking for a fairly standard hand-wrapping sequence, here's a common approach used in boxing, kickboxing, Muay Thai, and many MMA gyms.
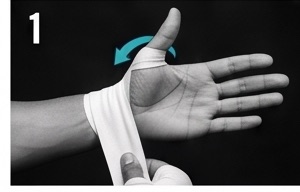
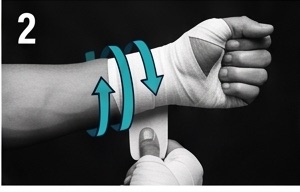
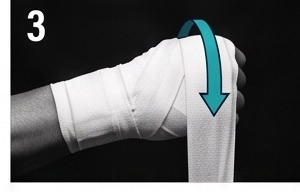
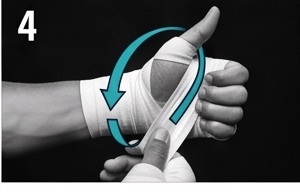
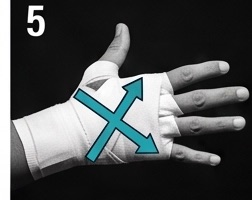
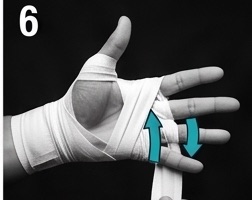
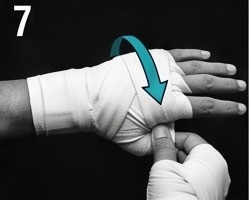
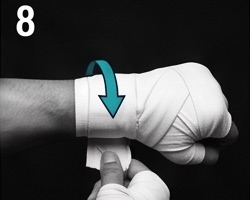
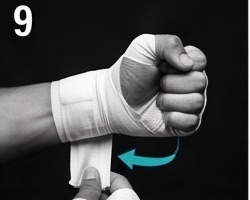
Phase 1: Anchor the wrist · the base every later pass pulls against
- Place the thumb loop over the thumb.
- Wrap 3–4 times around the wrist, front and back, for a stable base.
Cue: firm, not tight—if the fingers tingle at the base, unwrap and start looser.
Phase 2: Load the knuckles · this is the padding that protects the fifth metacarpal (the "boxer's fracture" bone)
- Pass over the knuckles 3–6 times—more passes, more padding.
- Circle around the thumb, then back to the wrist to anchor it.
Cue: the thumb anchor is what stops the whole wrap sliding mid-session.
Phase 3: Lock it in · ties the hand into one solid unit
- Cross a diagonal X-pattern over the back of the hand.
- On 180"+ wraps, weave between the fingers, starting at the pinky, to stabilize the metacarpals.
- Add another pass across the knuckles if more padding's needed.
- Finish wrapping at the wrist.
- Clench the fist before fastening the Velcro—so the wrap tightens where it should when a punch lands.
Cue: throw a few shots on the bag before gloving up; if it shifts, it's too loose.
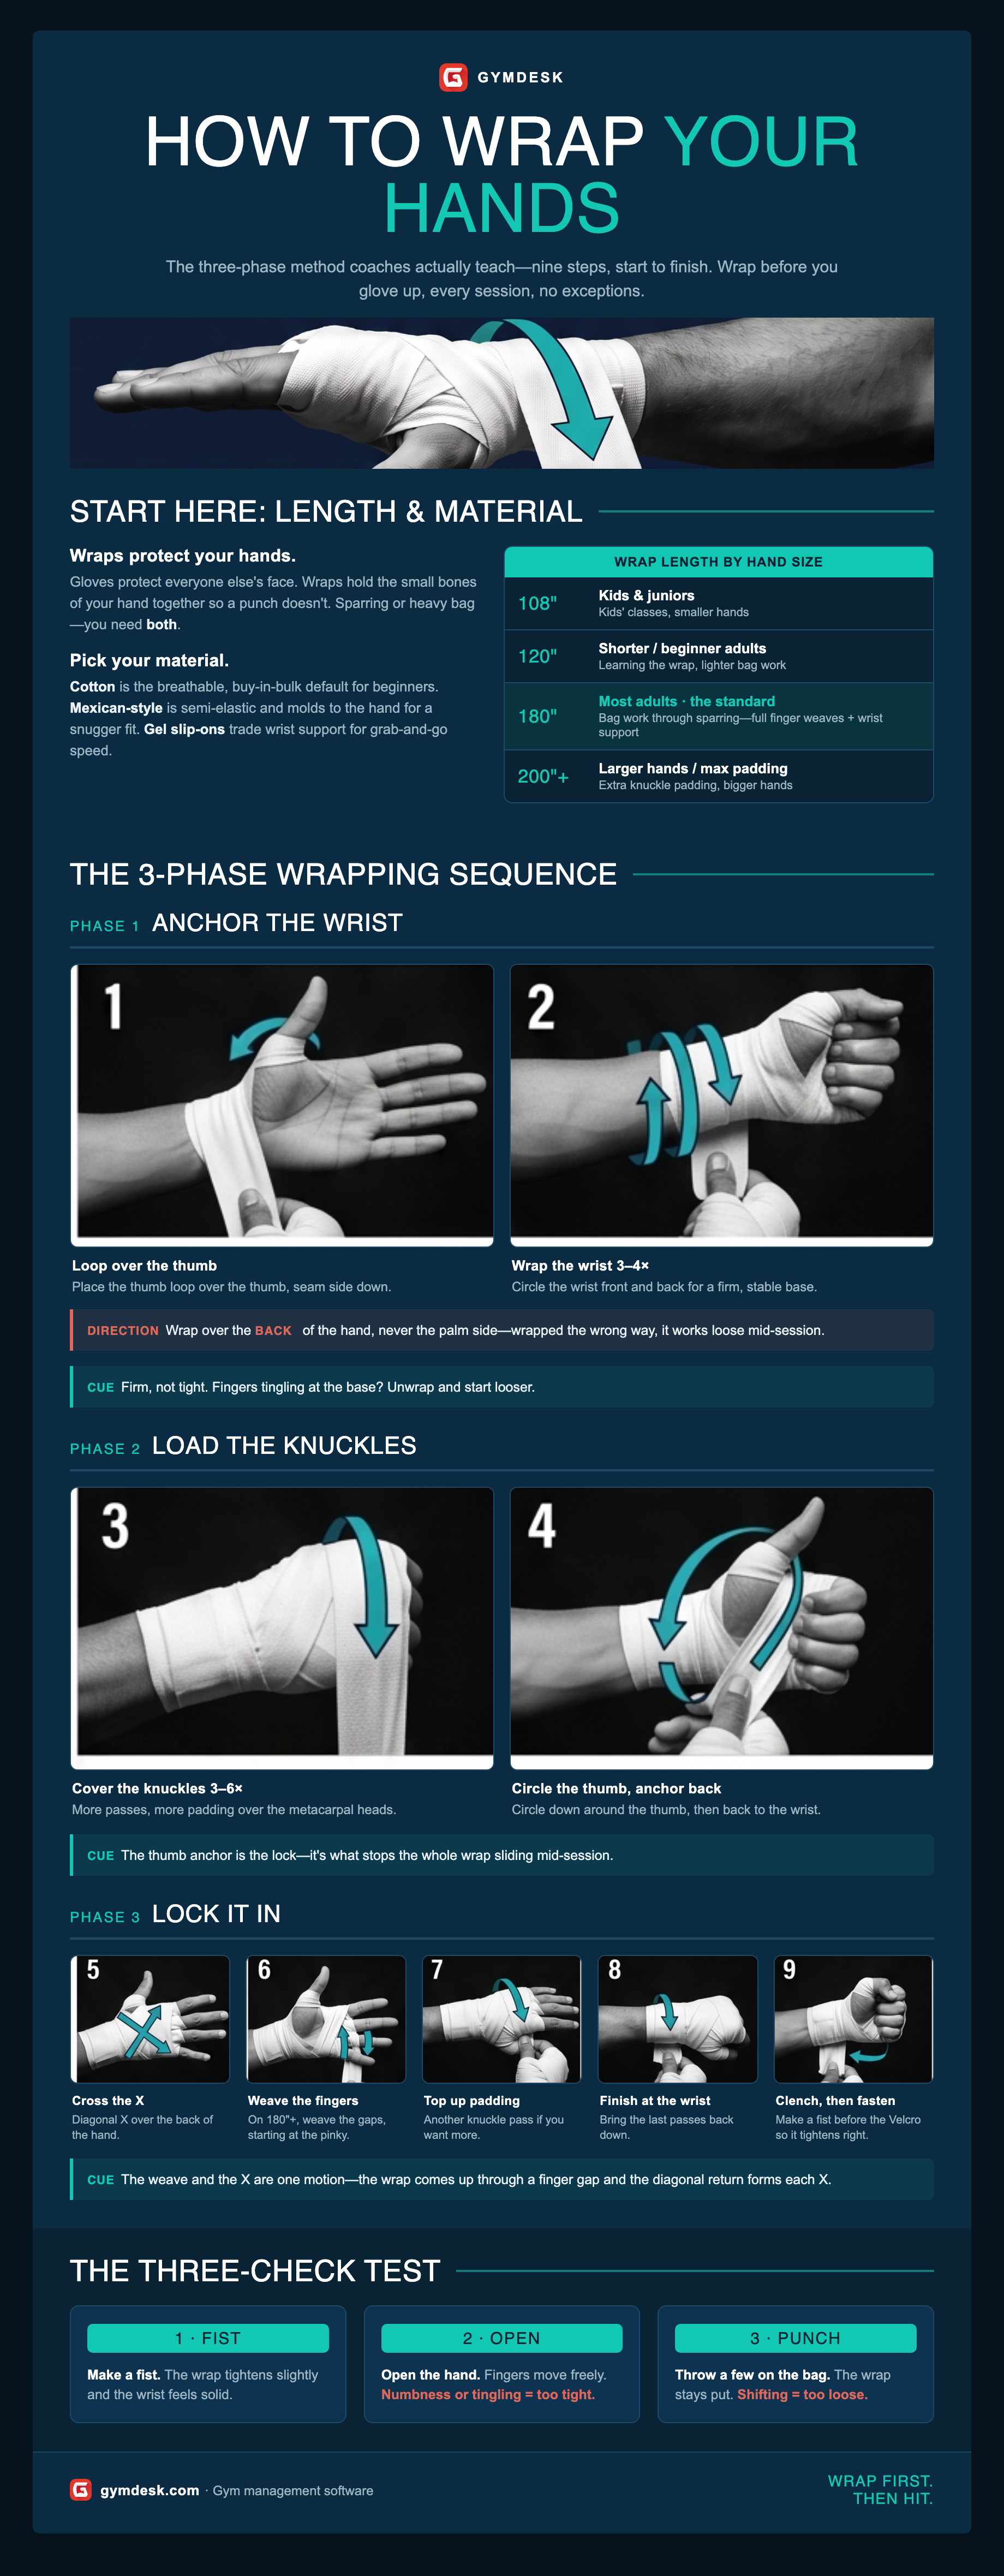
Here's a breakdown of different methods you can choose from, starting with the standard sequence shown above:
Method |
Video |
What's different |
Watch if… |
Standard sequence |
▶ Embedded above |
Thumb loop, X-pattern, finger weaves |
You want the default most gyms teach |
No thumb-loop |
Skips the thumb loop entirely |
Your students find loops fiddly |
|
Same wrap, more detail |
Slower, more wrist detail |
A student wants the deep-dive |
How to Tell Your Wrap Is Right
Did they do it right?
Here's a three-step checklist your students can use to evaluate whether they've done a good job wrapping their hands.
The three-check test
Check |
Have the student… |
Looking for |
Too tight / too loose |
Fist |
Make a fist |
Wrap tightens slightly, solid wrist support |
— |
Open |
Open the hand |
Fingers move freely, no numbness/tingling/color change |
Numb or tingling = too tight |
Punch |
Throw a few on the bag |
Wrap stays put |
Shifts = too loose |
Hand wraps should provide your students' hands with the support, structure, and protection they need. If students do a quality job, the risk of hand injuries decreases pretty significantly.
Hand Wrapping Beginner Mistakes
Here are some common mistakes beginners make when wrapping their hands.
Beginner mistake |
Why it's a problem |
How to fix it |
Quick check |
Wrapping too tightly from the beginning |
Reduces circulation and causes numbness or tingling |
Apply firm, even tension and tighten gradually |
Fingers stay warm, and you can make a full fist comfortably |
Skipping the wrist foundation |
Increases the risk of wrist bending or sprains on impact |
Make 2–3 secure passes around the wrist before moving to the hand |
Wrist feels stable without restricting movement |
Forgetting to anchor the thumb |
The wrap can shift or bunch up during training |
Loop around the thumb as directed, then return to the wrist to lock it in place |
Thumb moves freely, but the wrap stays secure |
Using too little knuckle padding |
Increases pressure on the knuckles and can cause bruising |
Make 3–6 passes across the knuckles (or fold extra padding if needed) |
Knuckles feel cushioned without making the glove too tight |
Wrapping too loosely |
Wraps slide during training and provide less support |
Keep consistent tension throughout the wrap |
Wrap doesn't shift when opening and closing your hand |
Crossing wraps unevenly between fingers |
Creates pressure points and bunching |
Keep each pass flat and untwisted |
No pinching or rubbing between fingers |
Leaving gaps or wrinkles |
Creates hot spots and uneven protection |
Smooth the wrap after every pass |
Wrap lies flat against the skin |
Not testing the wrap before training |
Problems may not be noticed until punches are thrown |
Make a fist, shadowbox, and adjust before putting on gloves |
Comfortable, secure, and no numbness or pain |
So what's the fix for each of these issues? Practice.
Seriously. The more practice your students get wrapping their hands, the easier it will be for them to identify what's working (and what's not).
Wrapping in a Gym
Quality boxing gyms treat handwrapping as an essential part of every beginner's first lessons.
Teaching it on day one
If coaches are doing a great job with new student orientation and onboarding, they demonstrate various handwrapping methods.
They take the time to supervise their student's first few attempts. They verify wrist support before students begin throwing punches.
Why the emphasis on hand wraps?
Remember earlier when I shared research showing how common metacarpal fractures are in boxing? Injuries directly impact your cash flow.
Gyms that teach their students the fundamentals experience fewer training injuries, the very same injuries that negatively impact your first-90-day member retention.
Kids' classes
Kids are smaller, so they usually benefit from shorter hand wraps and direct, hands-on assistance.
As a coach, you'll want to wrap younger students' hands until they learn how to do it on their own.
Hygiene in a shared gym
Hand wraps, like gloves, absorb sweat throughout each session. Teach your students how to keep their hand wraps clean.
Provide step-by-step instructions on maintaining equipment hygiene. This includes:
PRO TIP:
Teach equipment hygiene alongside the wrap: wash hand wraps regularly in a mesh laundry bag, air dry them completely before storing them, and never leave damp, stinky wraps sitting in a gym bag.
Clean wraps don't smell — and they cut the risk of skin infections like staph in shared gym spaces.
If you're running a structured onboarding program for your beginners, check out our start-up guide. It'll give you additional onboarding ideas and instructions to improve your beginner programs.
Wrap Your Hands First, Then Hit
Teaching your students how to wrap their hands properly is essential.
It's awkward for new students—but it becomes muscle memory once they've absorbed the skill. It takes about a minute.
But it's an essential step that's designed to protect your fingers, knuckles, and wrists, whether you're training in boxing, kickboxing, Muay Thai, or just getting some rounds in on the heavy bag.
Teach your students to start their session with good hand wrapping, and you'll find they're able to avoid the kind of hand fractures following students at other gyms.
If you're dealing with a lot of administrative to-dos, Gymdesk can help. Great gym management software tools handle much of the day-to-day to-dos for gym owners.
This frees up the time you need to help students perfect the details that matter—their handwrapping skills, technique, and performance. Get your free 30-day trial; No contracts. No hidden fees. No credit card required.
Gym management software that frees up your time and helps you grow.
Simplified billing, enrollment, student management, and marketing features that help you grow your gym or martial arts school.


FAQ
Boxing Hand Wraps FAQs
.webp)
Andrew McDermott is a gym owner, Brazilian Jiu Jitsu brown belt, and digital marketer. He’s on a mission to build premier, high-stakes grappling tournaments, world-class academies, and a championship team of high-level athletes.